Using EmberJS with XState

“Machines take me by surprise with great frequency”
- Alan Turing
Full Source Available on Github
Over the past year or so, the front end team at iManage Closing Folders has been experimenting with state machines and EmberJS. We've been pretty happy with the resulting code and I anticipate that we'll continue to use state machines moving forward. We still have a lot to learn about XState itself (it's a huge project), but I think we have enough knowledge to share some basics.
Heads Up: if you're interested in a deeper integration between EmberJS and XState I would suggest checking out ember-statecharts. We specifically wanted to avoid adding more dependencies to our projects, but ember-statecharts looks great.
What Are the Benefits of State Machines?
- It forces us to reconcile component design upfront by considering all the states we want our component to handle
- It’s a framework agnostic way of defining presentational state
- It’s easy to unit test
- You can generate state diagrams from the code you write
- Template code can be greatly simplified
- It eliminates emergent states in favour of explicit states; as an example, if you have two boolean states on a component
isSavingandisError, you actually have four states to consider.
What Are the Drawbacks?
- It’s yet another dependency
- XState has a large conceptual overhead with lots of esoteric concepts
- It’s confusing if you don’t have experience with it
The Plan
This is a contrived example, but I think it goes far enough to demonstrate the basics of using XState with EmberJS. We’re going to look at how we can use XState and Ember to implement a (very) basic signup form. This particular example could be implemented fairly easily using ember-concurrency, but in the wild our components are often much more complex and can justify the use of state machines.
I won’t be explaining XState in great detail, for that I would suggest watching the free video series on egghead.io. Instead, this article will introduce some basic concepts and demonstrate how we develop XState powered components in Ember.
The Form
Let’s talk about this signup form. It’s going to have two fields, a submit button, an error state, and a success state. Check out the GIF below to see the interactions:
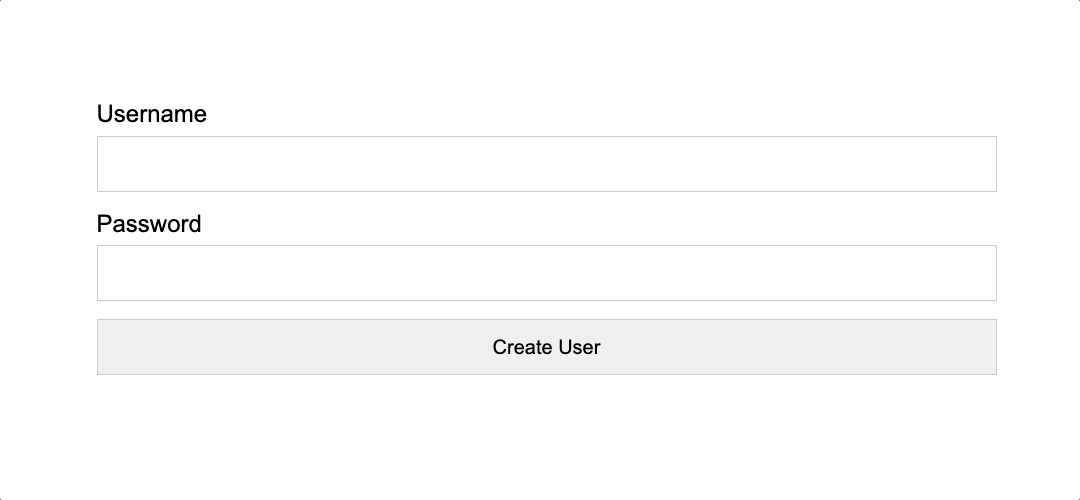
When the user puts in any value for username and password we will display a success message. Otherwise we will display an error message and allow them to retry.
The State Machine
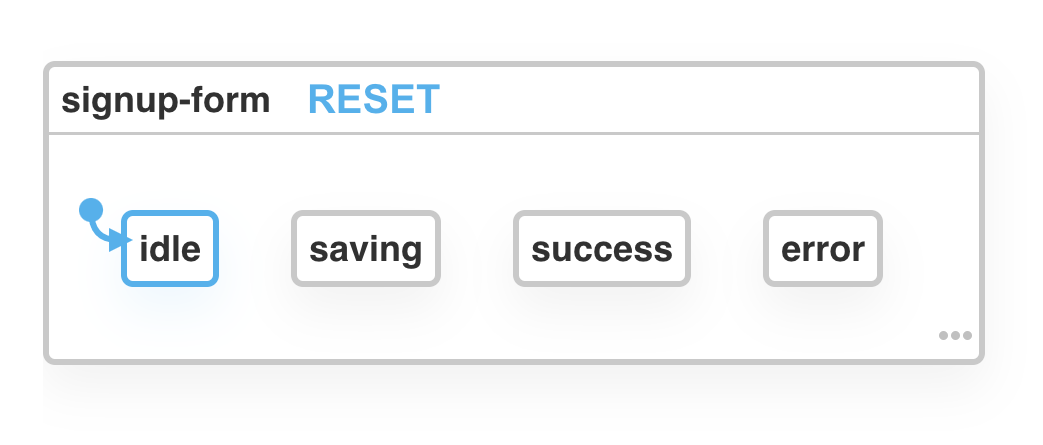
In abstract terms, this form will have 4 possible states: idle, saving, success, and error. Within XState we use the createMachine method to start defining our machine. The basic shape of an XState machine looks like this:
import { createMachine } from 'xstate';

createMachine({
  id: 'signup-form',
  initial: 'idle',
  states: {
    idle: {},
    saving: {},
    success: {},
    error: {},
  },
});
What’s so nice about this is that you can paste this code into the XState Visualizer and generate a diagram of how your state machine operates – 🎉 super handy! 🎉
Moving Between States
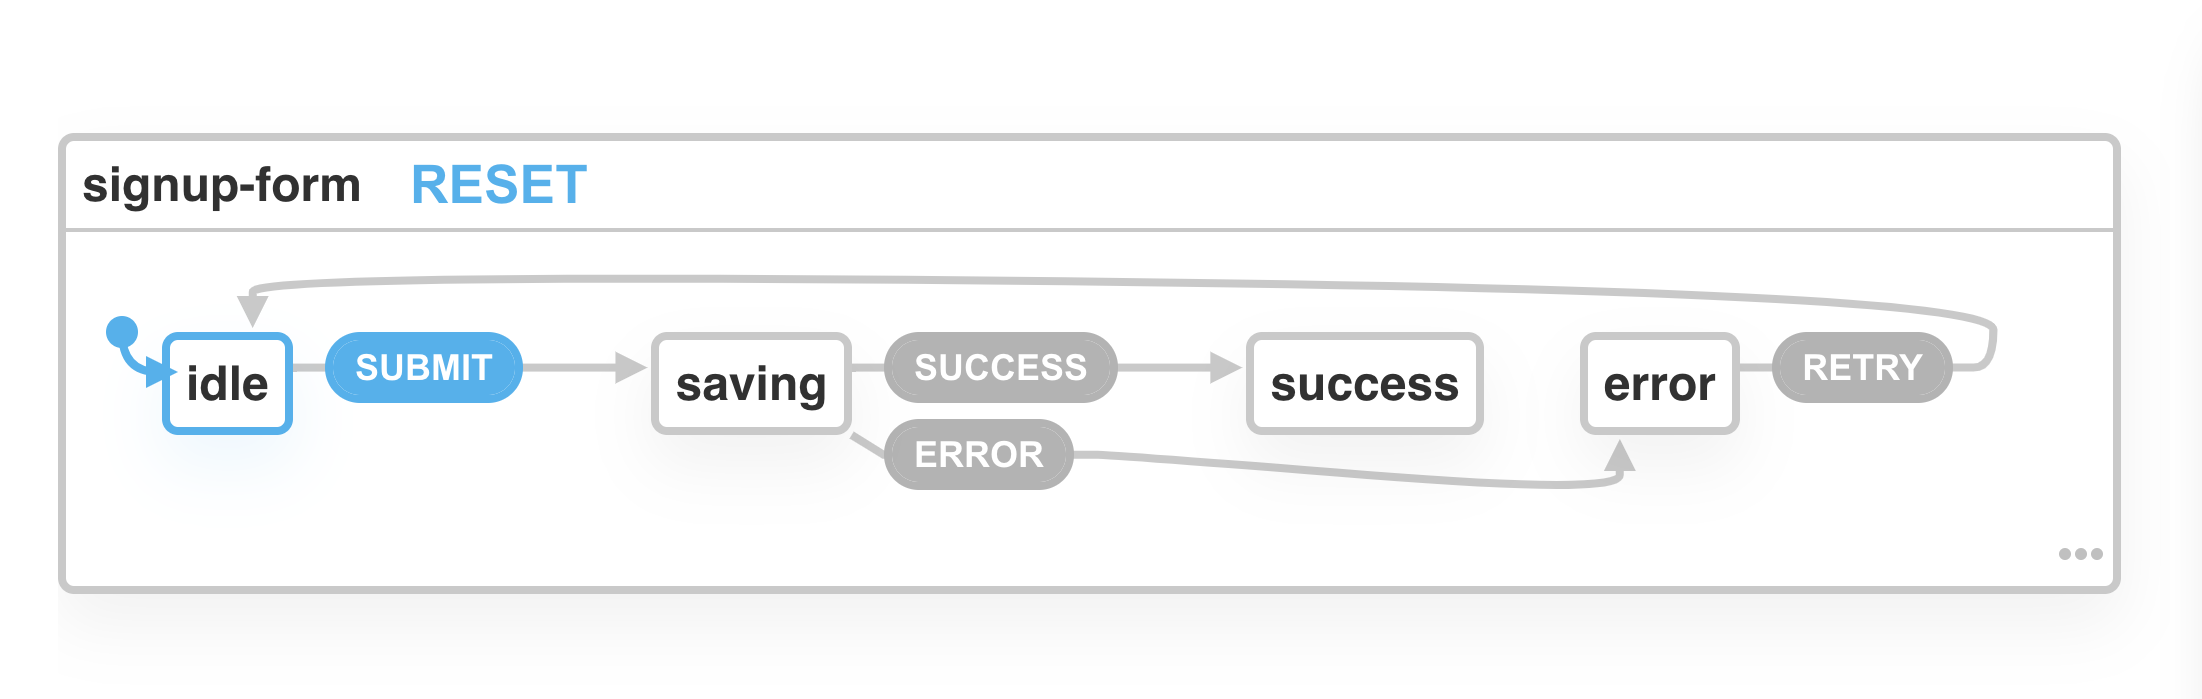
Our state machine is not very useful yet. As defined, it cannot transition between states. To enable that, we need to define events for each state using the on property. Look at the idle state definition - here we are saying "when in the idle state, if the machine recives a SUBMIT event, transition to the saving state."
import { createMachine } from 'xstate';

createMachine({
  id: 'signup-form',
  initial: 'idle',
  states: {
    idle: {
      on: {
        SUBMIT: 'saving'
      },
    },
    saving: {
      on: {
        SUCCESS: 'success',
        ERROR: 'error'
      },
    },
    success: {},
    error: {
      on: {
        RETRY: 'idle',
      },
    },
  },
});
With our events defined, our state visualization starts to make a lot more sense and we can now transition between states by sending our state machine events.
//=> This would transition our machine to the `saving` state
machine.send({type: 'SUBMIT'});
The Context Object
The next XState concept I want to touch on is the context object. This is an object defined within our state machine that allows us to persist and pass around data. In our case we want to store the username and password.
import { createMachine } from 'xstate';

createMachine({
  id: 'signup-form',
  initial: 'idle',
  // Lets add some context...
  context: {
    username: '',
    password: '',
  },
  states: {
    idle: {
      on: {
        SUBMIT: 'saving'
      },
    },
    saving: {
      on: {
        SUCCESS: 'success',
        ERROR: 'error'
      },
    },
    success: {},
    error: {
      on: {
        RETRY: 'idle',
      },
    },
  },
});
There are a number of ways to set values on the context object, but I’m going to give a simple example using an action callback. To learn more about actions I’d suggest checking out the docs, there is a lot to unpack. In our case we are going to use an action callback to set the username and password property on our context object. When we send the SUBMIT event from our Ember app, we can attach extra information that comes through in our action callback.
// When sending an event to the state machine you can pass extra data that becomes available in `action` callbacks
machine.send({
  type: 'SUBMIT',
  username: 'joe',
  password: 'password123'
});

// ...
// definition of our `idle` state
idle: {
  on: {
    SUBMIT: {
      target: 'saving', // transition to `saving`
      actions: [
        function(context, eventPayload) {
          // eventPayload is the object we send to the machine
          context.username = eventPayload.username;
          context.password = eventPayload.password;
        },
      ],
    },
  },
},
// ...
Saving the User (well… faking it anyway)
There are times when you may want a transition to be contingent on the results of an async operation rather than explicitly sending events to your machine. In our example, when the form is submitted we would likely hit an API and depending on the result, transition to either the success or error state.
To accomplish this we can use the invoke property when defining our saving state. There is a lot to know about invoke, but in its most simple form it allows you to register a callback that returns a promise. In our case if the promise is resolved we want to transition to the success state, and if it’s rejected we want to transition to the error state.
Check it out:
// We define a "service" (callback) to invoke that returns a promise.
// In our case I am trying to mock out an API call... Also, notice how this callback recives the context object
function fakeServerResponse(context) {
  return new Promise((resolve, reject) => {
    later(() => {
      if (context.username && context.password) {
        resolve('Valid!');
      } else {
        reject('Invalid!');
      }
    }, 1000);
  });
}


// ...
// definition of our `saving` state
saving: {
  invoke: {
    id: 'fakeServerResponse',
    src: fakeServerResponse,
    onDone: {
      target: 'success',
    },
    onError: {
      target: 'error',
    },
  },
},
// ...
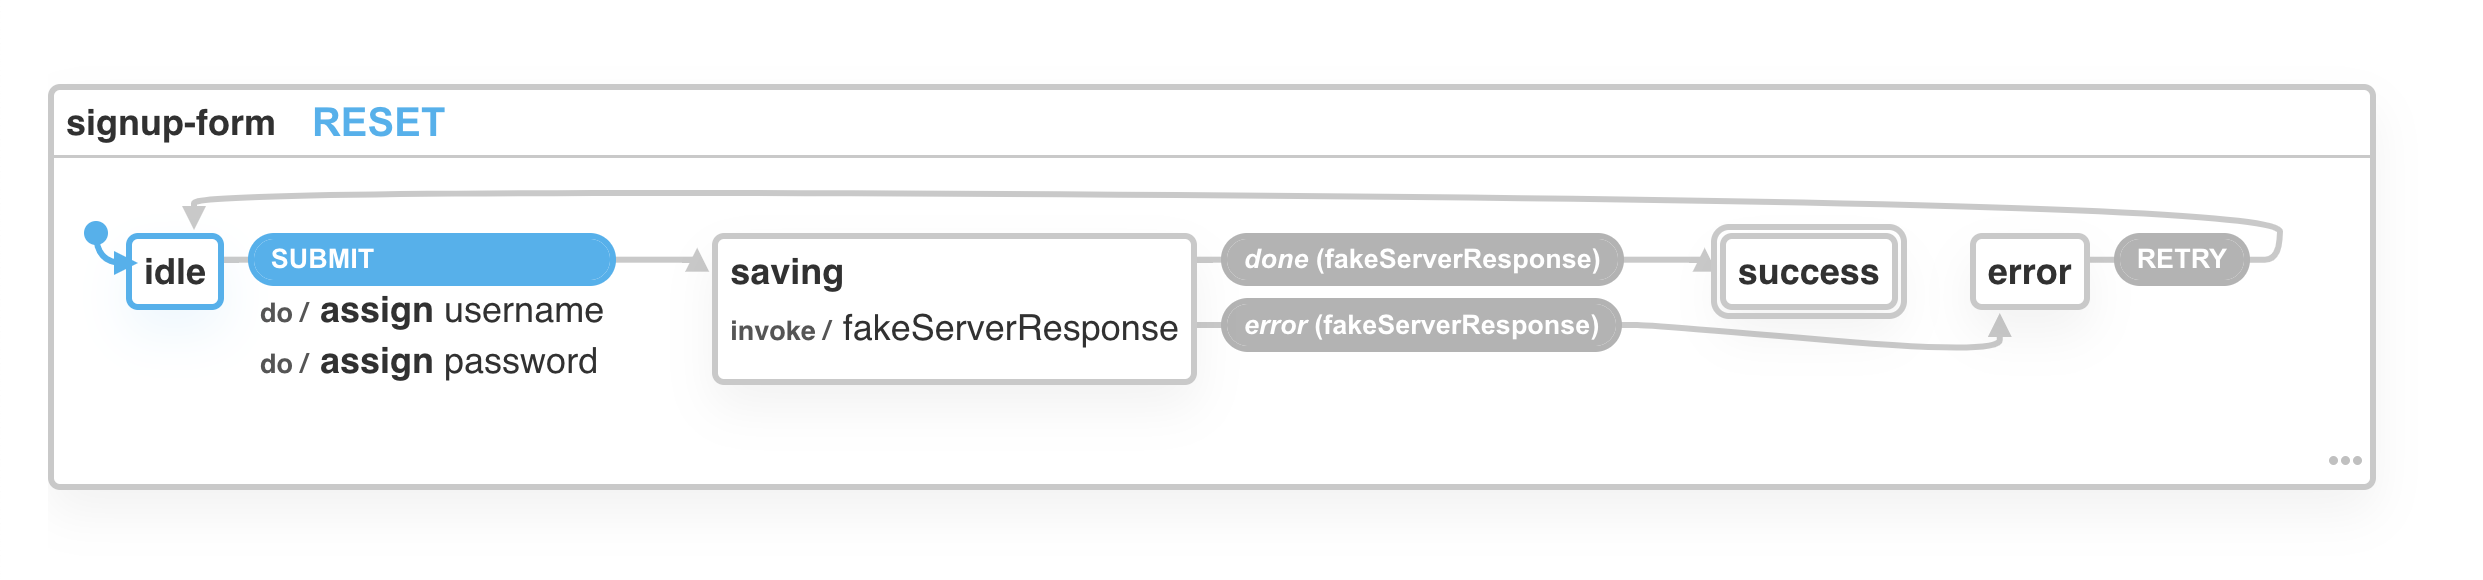
The Final State Machine
Below you will find the state machine in its entirety. I’ve made some slight adjustments to the action callback and added a couple extra properties, but it’s largely the same as we defined above. The resulting state visualization is awesome. Think about how helpful this could be when looking at a pull request.
function fakeServerResponse(context) {
  return new Promise((resolve, reject) => {
    later(() => {
      if (context.username && context.password) {
        resolve('Valid!');
      } else {
        reject('Invalid!');
      }
    }, 1000);
  });
}

let signupFormMachine = createMachine({
  id: 'signup-form',
  initial: 'idle',
  context: {
    username: '',
    password: '',
  },
  states: {
    idle: {
      on: {
        SUBMIT: {
          target: 'saving',
          actions: [
            assign({
              username: (context, event) => event.username,
              password: (context, event) => event.password,
            }),
          ],
        },
      },
    },
    saving: {
      invoke: {
        id: 'fakeServerResponse',
        src: fakeServerResponse,
        onDone: {
          target: 'success',
        },
        onError: {
          target: 'error',
        },
      },
    },
    success: {
      type: 'final',
    },
    error: {
      on: {
        RETRY: 'idle',
      },
    },
  },
});
What About Ember?
So this is actually the easy part! The basic premise here is that we instantiate our state machine within the constructor of our component. This allows us to hook into a onTransition callback that is exposed by XState. Every time our machine transitions, we just update the state attribute of our component.
We also add two actions to the component. One that handles general send events to our state machine and another that handles the form submit. I think it’s pretty self explanatory if you’re familiar with Ember.
import Component from '@glimmer/component';
import { tracked } from '@glimmer/tracking';
import { action } from '@ember/object';
import { later } from '@ember/runloop';
import { createMachine, interpret, assign } from 'xstate';

// We would define the state machine here and assign it to a variable named
// `signupFormMachine`. I've left this out for the sake of brevity, but you can see
// it in the full source if needed.
//
let signupFormMachine = createMachine(/* machine defined here */);

export default class SignupFormComponent extends Component {
  @tracked state;
  @tracked username;
  @tracked password;

  constructor() {
    super(...arguments);
    this.machine = interpret(signupFormMachine);
    this.machine.start();
    this.machine.onTransition((state) => {
      this.state = state.value;
    });
  }

  @action
  send(eventName, e) {
    e.preventDefault();
    this.machine.send(eventName);
  }

  @action
  submit(e) {
    e.preventDefault();
    this.machine.send({
      type: 'SUBMIT',
      username: this.username,
      password: this.password,
    });
  }
}
Show Me the Handlebars!
Alright, so let's check out the component template. It’s pretty clean and easy to read since everything is relying on the state machine. The big things I like about this are:
- There is no potential for weird emergent states. Our template conditionals are very clearly defined in simple
#ifblocks usingember-truth-helpersubexpressions. - For simple button clicks, we can just use the
(fn this.send 'EVENT_NAME')pattern to proxy messages directly to the state machine. - If we need to do some extra work before sending an event to the state machine you can use a standard ember action like we’ve done on the form submit event.
<form class="signup-form" autocomplete="off"> <div class="field"> <label for="username">Username</label> <Input @id="username" @type="text" @value= /> </div> <div class="field"> <label for="password">Password</label> <Input @id="password" @type="password" @value= /> </div> <input type="submit" value="Create User" /> <input type="submit" value="Saving..." disabled /> </form> <div class="success"> <p>⭐️ User created!</p> </div> <div class="error"> <p>🚫 There was an error submitting the form</p> <button > Try Again... </button> </div>
I hope this has been a somewhat compelling introduction to using XState and EmberJS. If you have any questions or comments feel free to reach out on Twitter or on the EmberJS Discord. If this is the type of thing that gets you fired up, please come work with us at iManage, we're hiring!